
Using City Pages
Bullseye's City Pages lets you easily create SEO friendly pages that showcase location and power Google's local search capabilities.
| Requirements: Local Pages subscription. |
City pages are available for the React interface with a Local Pages subscription. They're available when an interface is configured with Local Pages and the List Interface.
City pages are a visually attractive and powerful SEO tool. They're designed to support SEO by being crawlable and indexable, and are loaded with keyword rich and localized meta tags. City pages help your locations get found through localized searches like "find building materials providers near me", providing users with a direct link to your locations in their area. They're a great way to help promote your local searchability.
There are 3 main steps to getting local pages up and running:
- Add a City Collection
- Build the list of cities to include in the Collection
- Configure a search Interface to use Local Page, the list interface, and City Pages
To begin, log in to Bullseye and navigate to Interfaces > City Pages.
City Collections
Account Admins can create multiple City Collections. This can be useful when using multiple interfaces to support multiple brands or countries. City Collections define the cities, states, and countries that will be included on the list interface, and can be limited to a category or country by configuring the interface with a category or country limiter. The Collection organizes the cities and can be configured with default values that will be used with each city to find locations and build the city page. Each city that is defined in the collection is displayed in the list interface, and opens a City Page that displays locations within a specified radius. Each location on a city page links to their own unique local page.
Make sure the City Pages are enabled under Settings/Set Up/Modules.
To add a city collection, navigate to Interfaces > City Pages and click the Add City Collection button. To edit one, click the Edit link next to the Collection name.

When you add a new collection, you'll see the following screen:
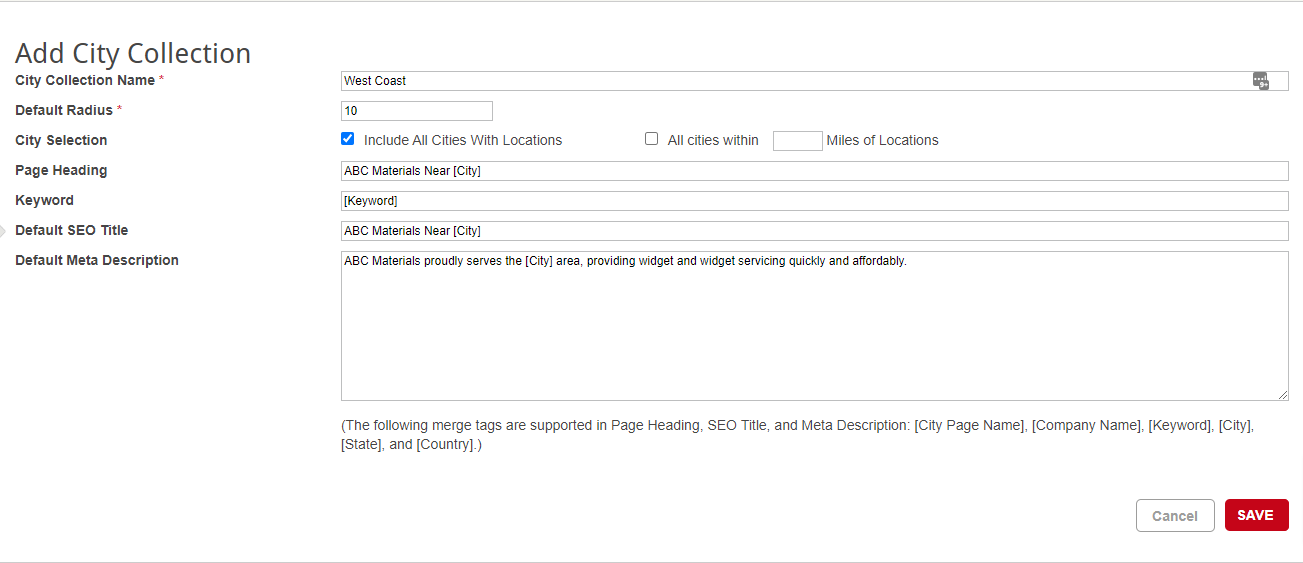
City Collection Name: Configure a descriptive name for the Collection. This is a required field, but isn't displayed anywhere on the city pages.
Default Radius: Configure the radius that the City Page will use for the location search. Search will return locations within this radius starting from the centerpoint of the city. This default value can be overridden on individual cities, so you can configure a larger radius in smaller cities, for example. This is a required field and will be used for every city unless it is overwritten.
City Selection: Enable one of these options as the starting point to generate the list of cities. From here you can add or delete cities as needed. You don't have to use either option, and can add cities manually if desired. This option can only be configured when the collection is added.
- Include All Cities with Locations: This option builds a list of cities from the locations in your account - all of the cities that exist in the account are included.
- All Cities Within # Miles of Locations: This option builds a list of cities from the locations in your account, plus all of the cities within the radius you define, around those cities.
Page Heading: Enter a heading here that will be displayed at the top of every city page. Use merge tags to individulize and localize the heading. The following merge tags are available:
- City Display Name - This is an alternate name that you can give a city. For example, you could give New York the alternative name "The Big Apple"
- Company Name - This is the Account Name you create your Bullseye Account with, like "ABC Materials"
- Keyword - This is a simple term that describes your business that you can define in the Keyword field on the page. It's not used on the city pages at this time, but we plan on adding it in the future.
- City - This is the name of the City
- State - This is the State that the City is in
- Country - This is the Country that the State is in
Keyword: A simple term that describes your business - like "building materials" or "widgets"
Default SEO Title: Enter a default title that will be used to construct the title metatag on every city page. Use merge tags described above to individulize and localize the heading. The title metatag is only visible in the source code, but it's important to Google! This default value can be overridden on indifidual cities - the one configured here will be used for every city unless it is overwritten.
Default SEO Description: Enter a default description that will be used to construct the description metatag on every city page. Use merge tags described above to individualize and localize the heading. The description metatag is only visible in the source code, but it's important to Google! This default value can be overridden on indifidual cities - the one configured here will be used for every city unless it is overwritten.
When you edit a collection, the screen is similar, but it does not include the City Selection option:
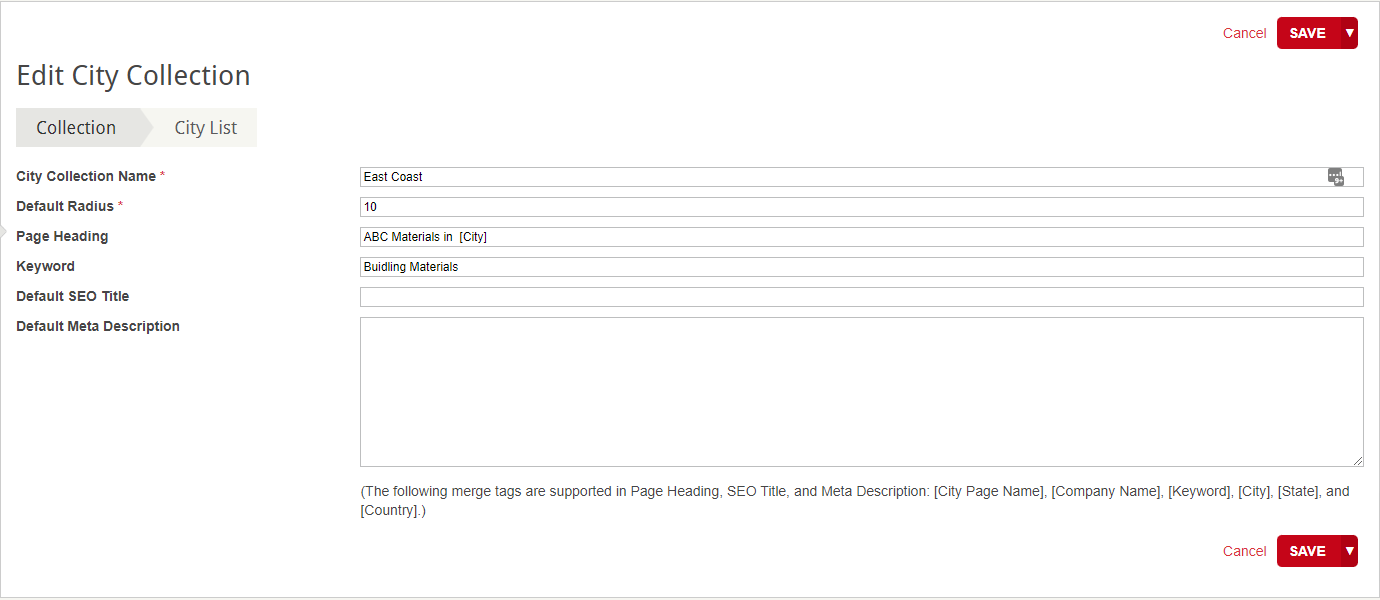

From this page you can Add, Preview, Edit of Delete cities.
To add a city to the list, click the Add Cities button, then select a Country and a State from the dropdowns. You'll see a list of cities that haven't been added yet. Enable any cities you'd like to add, then click Save to add them to the Collection.

To edit one, click the Edit link next to the City name. You'll see a screen like this. After editing, click Save:
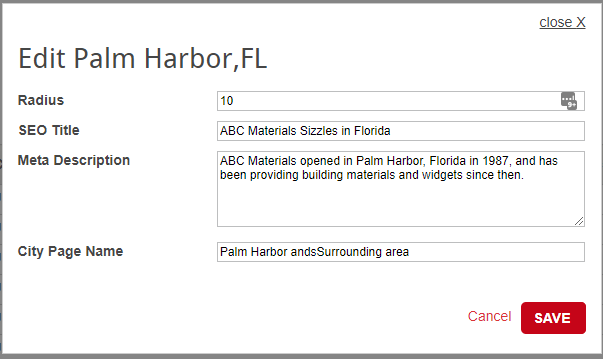
SEO Title: Enter a title that will be used to construct the title metatag on this city page. This value will overwrite the default SEO Title configured for the Collection. This field is not required - we will use the default value configured for the collection if none is provided here.
Meta Description: Enter a description that will be used to construct the description metatag on this city page. This value will overwrite the default SEO Meta Description configured for the Collection. This field is not required - we will use the default value configured for the collection if none is provided here.
City Page Name: Enter an alternative name for the city if you want the list and page to display something other than the official city name, like "The Big Apple" or "Palm Harbor and the surrounding area"
To preview a city, click the Preview link next to the city name. This is a great way to confirm you'll see the desired results. If there aren't many locations, consider increasing the radius for that city. This is also a good way to check that all of your locations have a location image, or don't, so that they're all consistent if you want them to be.
To delete a city, simply click the Delete link in the City list, then confirm that you want to delete it.
That all there is to configuring a City Collection. Next we'll configure an interface to display the List Interface and connect the list to the City Collection.
Configure a Search Interface to Include City Pages
If you haven't created a search interface yet, here's a guide to add an embeddable React interface.
Once you have a search interface, edit it and navigate to the Display tab. Enable the Create local pages for each location option, and select a local page template from the drop-down. Read more about using enhanced Local pages in our Knowledge Base. When local pages are configured, it's possible to enable the list interface. This option will create a super-crawlable list interface that helps spiders navigate through the countries, states and cities of your locations, so they access and index them. Once the list interface is enabled, enable city pages by selecting a Collection. This will modify the behavior of the list interface by building the list interface from the cities that are defined in the Collection. Click Save when you're done.
Read more about creating a list interface in our Knowledgebase
That's it! Now that you've created a Collection and added cities to it, and configured an interface to use enhanced local pages, the list interface, and city pages, you're done! View your interface, then open the list interface using the "View all locations" link at the bottom of results. Navigate through the list to a city and click on it to view the city page!