
Add an Embeddable React Interface
Bullseye's new embeddable Interface built with React lets you easily create a super fast and modernized interface with the same advanced features as our original embeddable interface
| Requirements: Any paid subscription. |
The React interface replaces the original interface for accounts created on or after 4/29/2022. Accounts created prior to 4/19/2022 can add either the original interface or the new React interface.
See the following articles in our Knowledge Base to learn more about adding our original interface:
Add The Map on Top or Map on Side Interface to your Site
Create a Promotion Page with Search Interface
Bullseye's embeddable React Interface lets you easily create a responsive store locator interface for your site, taking advantage of the adaptability inherent to responsive designs for desktop and mobile users. It’s not required, but the React interface enables the responsive option by default, because its appearance is more elegant when compared to the non-responsive option (especially for mobile users).
The React interface requires the use of category groups to use category related features like the category limiter, category filters, and category based map icons. See
Working with Category Groups for more information on using category groups.
In the course of this article we will create an interface - In this example, we will use the Map on Side Interface. Besides the appearance of the map, the features in the Map on Side interface generally apply to the Map on Top Interface as well. Other templates may include fewer options, but they work the same.
To begin, log in to your account and select Interfaces on the left. Then select the Embeddable React Interface and click
Add.

You'll see the screen below. Select the Map on Side template, then select
Next: Choose Options on the bottom right.:

You'll be taken to the Options screen:
Options

Next to the General heading, expand the plus sign on the right to expand. You'll see the following screen:

Responsive Interface: We suggest using this option, and it’s enabled by default. The responsive interface works the best with both desktop and mobile searches.
Page Max-Width: If you use the responsive option, the width of the locator interface will normally adjust to the setting you have on your website, and you can leave this option blank. Leaving the option blank will load the interface at full-width to fill whatever container it’s in. If you need to specify a particular width, you can also do this if necessary (valid values are between 640 and 1200).
Choose Countries: By default, the interface will search for all locations, for all countries included in your subscription. You also have the option to selectively include countries in your interface, if you need to exclude certain countries.
Cross Country Borders: If you are using the radius search, this option allows you to return locations within a radius that are in a neighboring country from the entered information. Your search rules must be configured to return radius results only for this to work.
Limit Search: If category groups are enabled, you have the option to limit the categories in the interface to one or more top-level categories within a group. You may want to use this option if you want to have more than one locator in your account, each designated to specific brands or products.
Internet Locations Only: You may select this option if you want the interface to search for internet locations only, instead of brick and mortar locations.
Events: Bullseye allows you to have events at locations displayed when locations are returned in the search results.
Google Analytics: You can configure your interface to send captured data from the Searches By Locations Report to Google Analytics. Events tracked in Google Analytics include all searches, locations returned in the results, locations clicked, and links clicked for a particular location such as Directions, URL, and Contact links.
To link your interface, Google Analytics does not need to be configured (Events are created automatically when the interface is linked.). However, you will need to get the Google Analytics code that comes with your Google Analytics account. In Bullseye, you will need to enter the code along with the Host URL in the interface:
- Host URL: Enter the exact URL of the site where the interface is going to be IFramed. The complete URL must be provided including "http/https".
- Google Analytics Code: Enter the code provided by your Google Analytics account, include UA-.
After that information is entered, you will need to re-implement the Bullseye Iframe code on your site. You can find the code in the Publish heading in the interface.
When you are done, you can close the General tab by selecting the minus sign, and expanding the Map tab:

When you are done, you can close the General tab by selecting the minus sign, and expanding the Search tab:

Default Search: There are 4 possible options for default search behavior. Only one Auto-search behavior can be selected.
Detect User Location on Page Load: By default, accounts are automatically able to attempt to detect a user’s location by their IP Address. This is required to perform an auto-search of locations based on the user's location. Uncheck this option to prevent a user's location from being detected and an auto-search from being performed.
Auto-search on page load: If location detection is on, locators can use Auto-search, based on a user’s location, to search for locations. This option cannot be selected if location detection is off. When using auto-search, you can choose whether to populate the search filter with the detected postal code or city and state.
- Use Postal Code for Auto-search: Select this option to populate the search text field with a detected postal code instead of city and state when users first arrive at the search.
- Use city and state/province for auto-search: Select this option to populate the search text field with the detected city and state instead of a postal code when users first arrive at the search.
Google Autocomplete: Google Autocomplete requires the use of your own Google API key. The Google API Key must have the Google Places API enabled. Autocomplete is a feature designed to make it faster to complete searches by suggesting locations as you begin to type.
Category Filters: If category groups are enabled and categories exist, this option can be enabled if it is desired that users be able to filter results by category. Filters may be displayed as checkboxes, multi-select, or within a drop-down menu for selection. If the drop-down filter option is selected, it’s possible to search by subcategories as well. Optionally, you can require a selection of a category or subcategory by users before a search will be conducted. Select the appropriate option as needed.
Radius Options: Add or remove radii as needed. If you need to add a radius, simply type it into the text box, and select add, or select Remove to remove existing radii. Use Set Default to make one of the radii default (The default radius is used in conjunction with location auto-detection. When users arrive at the search, the search can detect the location of the user, and search automatically within the default radius you set).
Keyword: Select this option if you want users to be able to search by the name of the location (this is entered in the Location Name field). Users may search for the name of the location on its own, or they may combine this with the radius search.
To configure Results, select the plus sign next to Results:

Display nearest Location when there are no results: Select this option if you want to display a single location that is closest when no results are found within the selected radius. This option is not available with territory search.
Display text when there are no results: Text to display when there are no results. Put a message that will explain to the user that no results were found. You may want to link to another page, or include a phone number for them to call.
To view the Display options, select the plus sign next to Display:

Custom Map Icons: By default, the map icon for your locations will be a red plot image. You can replace that image by uploading your own image(s). Multiple images can be uploaded and applied per category. First, select
Choose File to select the map icon (or drop the file into the box with your mouse). After that, a button will appear to upload the image. Select
upload. Make sure you complete both steps. When you upload subsequent images, you’ll have the opportunity to select a category within a category group to apply the image to. To make this work, you will simply need to upload a different map icon for each category and assign to the category. After you upload your 2nd map icon, you'll see an option to assign each icon to a category as in this screenshot:
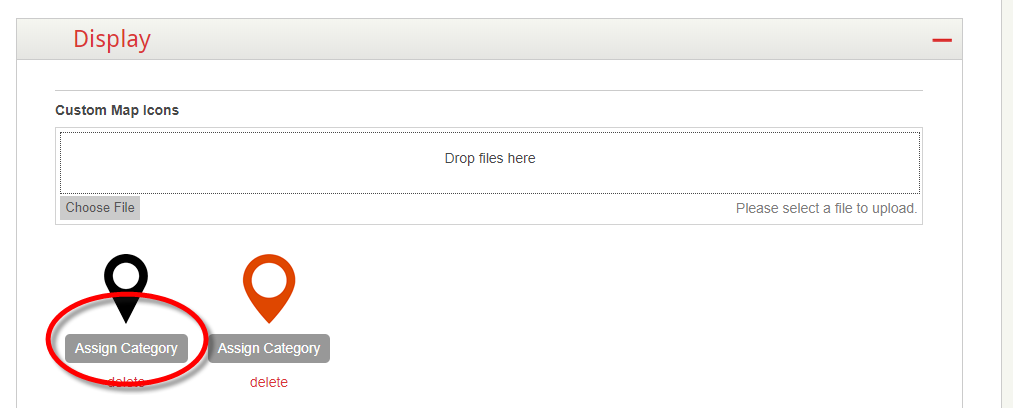
Select the assign category option, and you'll see a list of categories to select from. Select the correct category for the image. It’s important to note that if a location is assigned to multiple categories that use custom map icons, to icon assigned to the first category returned in the search will be used. Read more about
Working with Category Groups on our Knowledge Base.
Beneath the Custom Map Icons area, you'll see more options:

Categories in Results: Check this option to display the categories on locations when they are returned in the search results.
Promotions: Check this option if you want to include coupons/promotions on locations in the search results (Find subscription required also see
Promotions ).
Events: Check this option to display Events on locations in the search results (Find subscription required also see
Events).
Contact Name and Position: This option displays the name/position of a person at the location if you provide this information when you set up the location.
Location Image: Include an image on the location by checking this option. We suggest that square images no less than 300x300 pixels are uploaded. On the results, images are displayed at 150x150 pixels. Images smaller than that will be displayed at the smaller size. Images larger than that will be constrained to a max-width of 150px. Rectangular images may be cut off.
Phone Number: This option displays a "View Phone Number" link in results that must be clicked to reveal the phone number. This makes it possible to track phone number clicks.
Driving Distance: Display driving distance in addition to radius distance on results.
Local Landing Page: Display a link landing page/detail page for the location. The content for the landing page may be stored in Bullseye (Connect or Local Pages subscription required). Read more about
Using Enhanced Local Pages on our Knowledge Base, or watch our
Video Guides on our website.
Lead Capture: Display a link to a form for leads to fill out and submit to locations (Connect or Lead Manager subscription is required). Read more about
Lead Manager on our Knowledge Base.
List View: Display a link on the search interface that opens up an SEO-friendly list view of all your locations.
City Pages: If the list interface is enabled, you can create a City Page for each city in the account, or for a set of cities that you configure. A City Page showcases the locations in a city and creates a powerful SEO URL that Google will index to promote local searches (Local Page subscription required)
Login/Edit Location Link: Display a link to allow locations to log in and manage their own data in Bullseye.
To view the Language option, select the plus sign next to Language:
You will see a checkbox to enable the language dropdown. This option allows the user to select individual languages from a drop-down menu. Note that Bullseye is also able to detect the user's language automatically. This option allows the user to also select a language manually. This may come in handy if the user is bilingual, or if the user is using a browser in a foreign country. They can select the language from a drop-down menu to override the language that is displayed. If you want to select this option, select the check box. You will see the following:
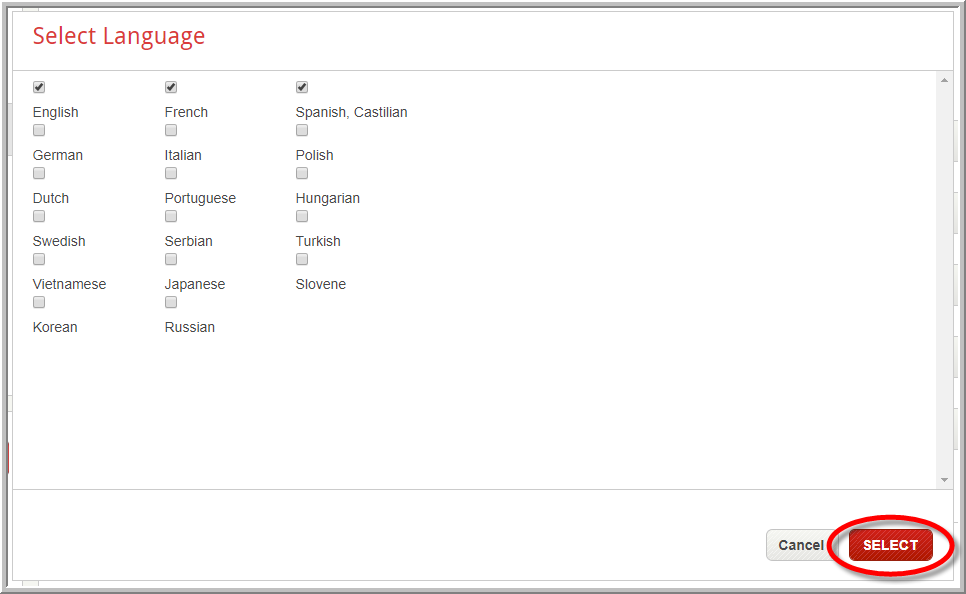
A list of languages will appear. Select the languages that apply to your locator then choose the
Select button;
If you have the SEO subscription, you'll also have an SEO section available. To view the SEO options, select the plus sign next to SEO:

Location Identification: The SEO subscription automatically constructs SEO optimized landing page URLs. This option gives you the choice of using the internal Bullseye ID or a Third Party ID. If using Third Party ID, make sure all locations have a value in this field.,
Location name or keyword: When constructing the URL structure which will link to the landing page, you have the option of using the location's name or entering a custom keyword. If using a custom keyword, this keyword will be used in place of the location name in the query string. This can be helpful if you are optimizing locations on a particular keyword.
Title Tag: The title tag will be visible to search engines as the title of the interface. There is a similar option on each location that will be visible to search engines as the landing pages title.
Styles
When you are done with the Options tab, select Styles, you'll see the screen below:

Under Basic, you have the option of selecting a standard color for your template. If the options we include match the color of your website, you can select one of the colors, and the corresponding hex code for the style will appear under General Style Settings. If you need to customize any of the colors, you need to enter the code into the Background Color, Navigation Color, Button Color, or Link Color fields. After you change any of the colors, the custom option will appear as in the example above. From the Font drop-down, select the font family that best works with your site.
The Advanced tab lets you override our CSS with your own CSS. See
Advanced Styles History to learn how to create different versions of advanced styles for testing or historical purposes.:

You can write your own CSS in the provided text field to override our CSS styles on the interface and local pages.
Publish
When you are done, select
Publish at the top or
Next: Publish Options on the bottom. You'll see the following:

Now that you have the template, options, and styles configured, you are ready to save the interface so you can put the interface on your site, or link to our interface from your site. First, you need to save the interface. Select
Save as in the example above. You will be prompted to name the interface:

Enter the name of the interface (letters only) and select
Save and Close.
You'll be taken back to the list of interfaces. Select Edit on the appropriate interface, then Publish. You have the option to embed the interface in an IFrame on your site or to paste your site's headers and footers into our interface page, and link to it. Let's look at the IFrame option first. Select the Plus sign next to the option iFrame Embed for Website:

A text field will expand with the code that needs to be pasted into your website. There's a link in this code to the interface. The link will use the interface or account domain path, or the subdomain if there is no domain path. Simply paste the code into the area on your page where you want it to display.
Now let's look at the option to paste your header and footer into our page. If you'd rather not embed code on your site, or if there is some restriction enforced that prevents you from pasting into an iFrame, this option comes in handy. Select the plus sign next to the option Hosted URL with HTML input for Header and Footer:

If you are only using Bullseye's landing page, you can select the check box to enable landing pages only. Most clients use the entire locator. Select Enable Custom Code. You'll see 2 text fields to paste your custom code. Paste your header into the editor where it says Add your custom header code here. You can view the code or the normal look as you would view it on the web once you save it. You can do the same for the footer as well.
Finally, let's look at the XML Sitemap section. This section provides a link to an XML sitemap of your locations and City Pages (if configured) that you can submit to Google via your Search Console. A sitemap helps Google find and understand the hierarchy of your locations in order to provide relevant local search results. This helps your locations get found by people that search for your services in their area.

Once you're done, select
Save at the top.