
How to Configure Domain Paths
Configure domain paths so that search and location URLs can be rendered in an SEO friendly manner.
| Requirements: Available with all subscriptions |
Configuring domain paths will allow clients to make locator and location pages appear to be subdomains hosted within their domain, on their main site. There are multiple SEO benefits to this, including making it possible to add them to a site map and make them indexable, and allowing landing page URLs to be dynamically created using indexable, SEO-friendly geographical parameters.
Configuring domain paths requires configuration in Bullseye, as well as configuration of the hosting server’s DNS zone file. In Bullseye, domain paths can be configured for each interface if desired (with Bullseye’s help), or at the account level. These options allow different configurations for different needs. For example, if you administer multiple domains and use a locator on each, you can configure separate domain paths on each interface to make each appear to be a subdomain of their respective domain. Most people will configure one domain path for the account, under which any interface would appear to be hosted on the main site as a subdomain.
To configure an account level domain page, navigate to Settings > Account, and click the Edit button. Under the Configuration heading, you’ll see the following:
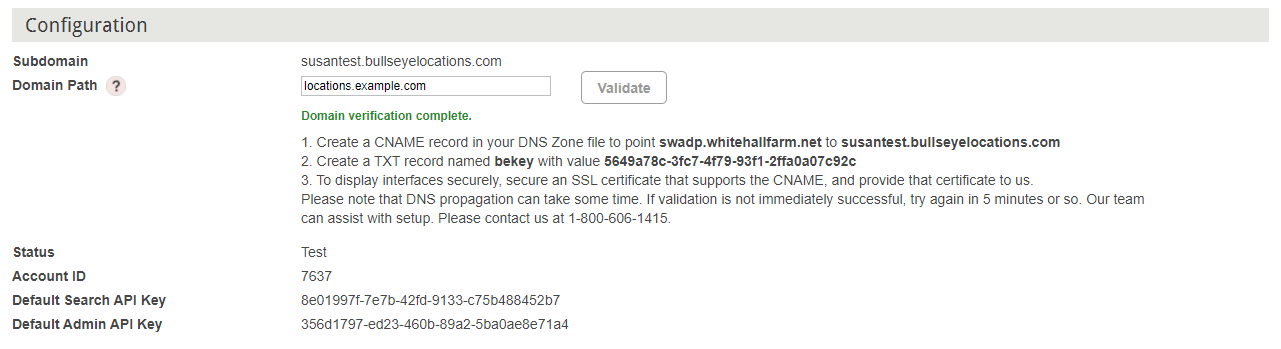
First, configure the domain path. The domain path includes the subdomain that you want to render interfaces under, as well as the main domain - something like “locations.example.com”.
The next few steps require access to the DNS zone file for the hosting domain. In this example that would be example.com. You’ll need to create 2 DNS records - a CNAME and a TXT record. How these will be configured may depend on the host. Here’s a link to GoDaddy instructions. The following instructions are general and should work for most hosts.
- Create a CNAME record to point “locations” to the Bullseye account’s subdomain. In this example, “susantest.bullseyelocations.com”.
- 2. Create a TXT record named “bekey” with the value 8392ad83-077f-4f2f-8ab5-b51bea5fa33b
Once those steps are complete, click the validate button. If you’ve configured the CNAME and TXT record correctly you’ll see the green success message “Domain verification complete”, and you’re done. If you’re having trouble, your DNS host’s help documentation might help, or we’re ready to help at 1 (800) 606-1415.
If you want interfaces to display securely at the domain path you’ve configured, you’ll need to provide us with an SSL certificate. In this example, the certificate would be for “location.example.com” or a wildcard certificate for “*.example.com”. We’ll install that certificate on our servers and work with you to renew it each year.
Now that the account domain path is configured, the name of the locator being viewed will appear following the domain path.
If the interface uses landing pages, landing page URL paths are built as subdirectories that are dynamically created based on the geographical information of each location mapped following the domain path and locator name. For example: locations.musicstaff.com/musicstafflist/us/nj/branchburg/location-name-1234 . In this example, locations.musicstaff.com is the domain path, “musicstafflist” is the locator name, and “us/nj/branchburg/ is comprised of the geographical data for the location named “location-name-1234”
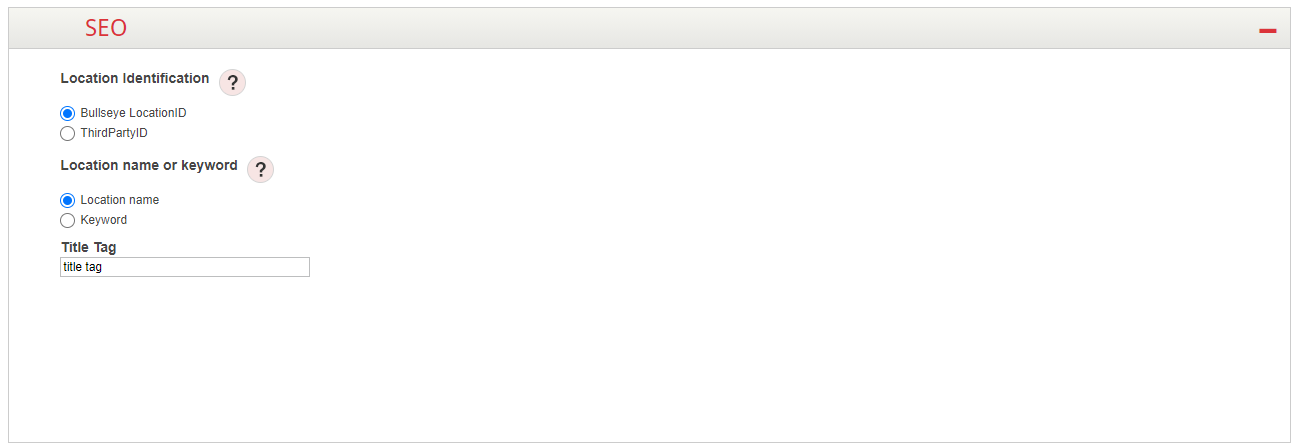
If you have the SEO subscription, you can choose whether to use the LocationID or ThirdPartyID in the URL, and whether to use a keyword in place of location name to identify the location in the landing page URL, by configuring it under the SEO accordion in the interface builder:
To configure domain paths on an interface, contact Bullseye Locations at 1 (800) 606-1415.